Creative Business Challenge - 30 days to boost your business
I know exactly how you feel – you have just finished your latest project and it looks brilliant. It’s the best design you came up with for a while and you are so proud of finishing it!
It’s 2 am.
Your fingers are numb from finishing the last stitches or sticky with a glue, but you are on a high!
Oh, lets take a quick photo and put it on the website straightaway! The whole world need to see and buy my best ever make today!
O.K. photo done, tired eyes, uploaded and click submit!
Sounds familiar?
If it does, please read on…
I know you products are brilliant, well made, original and full of lively design. But if you have a badly shot photo with a messy background, your customers won’t know. They won’t be able to see beyond the ‘not so brilliant’ photo to see your absolutely brilliant product.
Pictures are absolutely crucial in converting website visitors into customers.
Picture is the first thing that people will see.
It either grabs their attention and they read the title and click on the picture to find out more or they move on.
You have about 3-5 seconds.
That’s it
No more…
Photography Tips
These tips are absolute basic and minimum that everyone should know. Once you progress with taking your photos, you will find your own style, workout your camera settings and find more detailed tips and ideas on professional photography blogs or websites.
This is just the beginning of your journey…
Natural Light
The key to a good photo and photo that you don’t need to do huge amount of editing is to get as much natural light as possible.
Never use flash on your camera. If your flash comes on automatically, it’s far too dark to take photos anyway. Flash usually leaves very unflattering light effect on your pictures. If you are taking photos of framed pictures or anything wrapped in cellophane or plastic you also get a dreadful reflection and people can’t see exactly what the package contains.
If you have to use lights or lamps make sure they have natural light bulbs (blue). If not, put a screen of blue polypocket (or similar plastic) in front of the light. This will make it slightly more natural (and not too yellow).
Use reflector to reflect light back to your subject. You can use the back of large tin (silver colour), wrap a tin foil round a large carboard or buy professional reflectors. These are not that expensive and will make a huge difference in lighting up your products.
Don’t shot in a strong sun.
Perfect time is from 9-12 but afternoon light is also good. It just depends on which room is the best one for taking photos in your house.
Light tents
I’m not huge fan of these, probably because if you don’t have the right light, camera and understanding how to edit your photos, the pictures will still not be any better than if you take them with natural light. But this is just a personal opinion and I’m always happy to be proved wrong…
Background
Ideally go with something that will become your theme for the whole shop or website. Remember your ideal customer and your branding strategy in choosing your background and props.
For instance if your products are brightly coloured and made from very busy fabric it’s probably best to keep white background. If you have a see-through white beads, then a bit of colourful background is going to bring your product to life.
If you are taking photos of small items, the easiest thing is just to use coloured board (or white) or fabric draped over a chair. Rather than using two different boards, invest in a large white paper sheet (A2 or A3) and slightly bend the paper to achieve smooth background.
Background for large products
For large objects – such as aprons, quilts, cushions or similar try to use a real person as a model and take the photo in an appropriate setting. You should also have close up photos of any large product to show off the best features.
Picture Composition
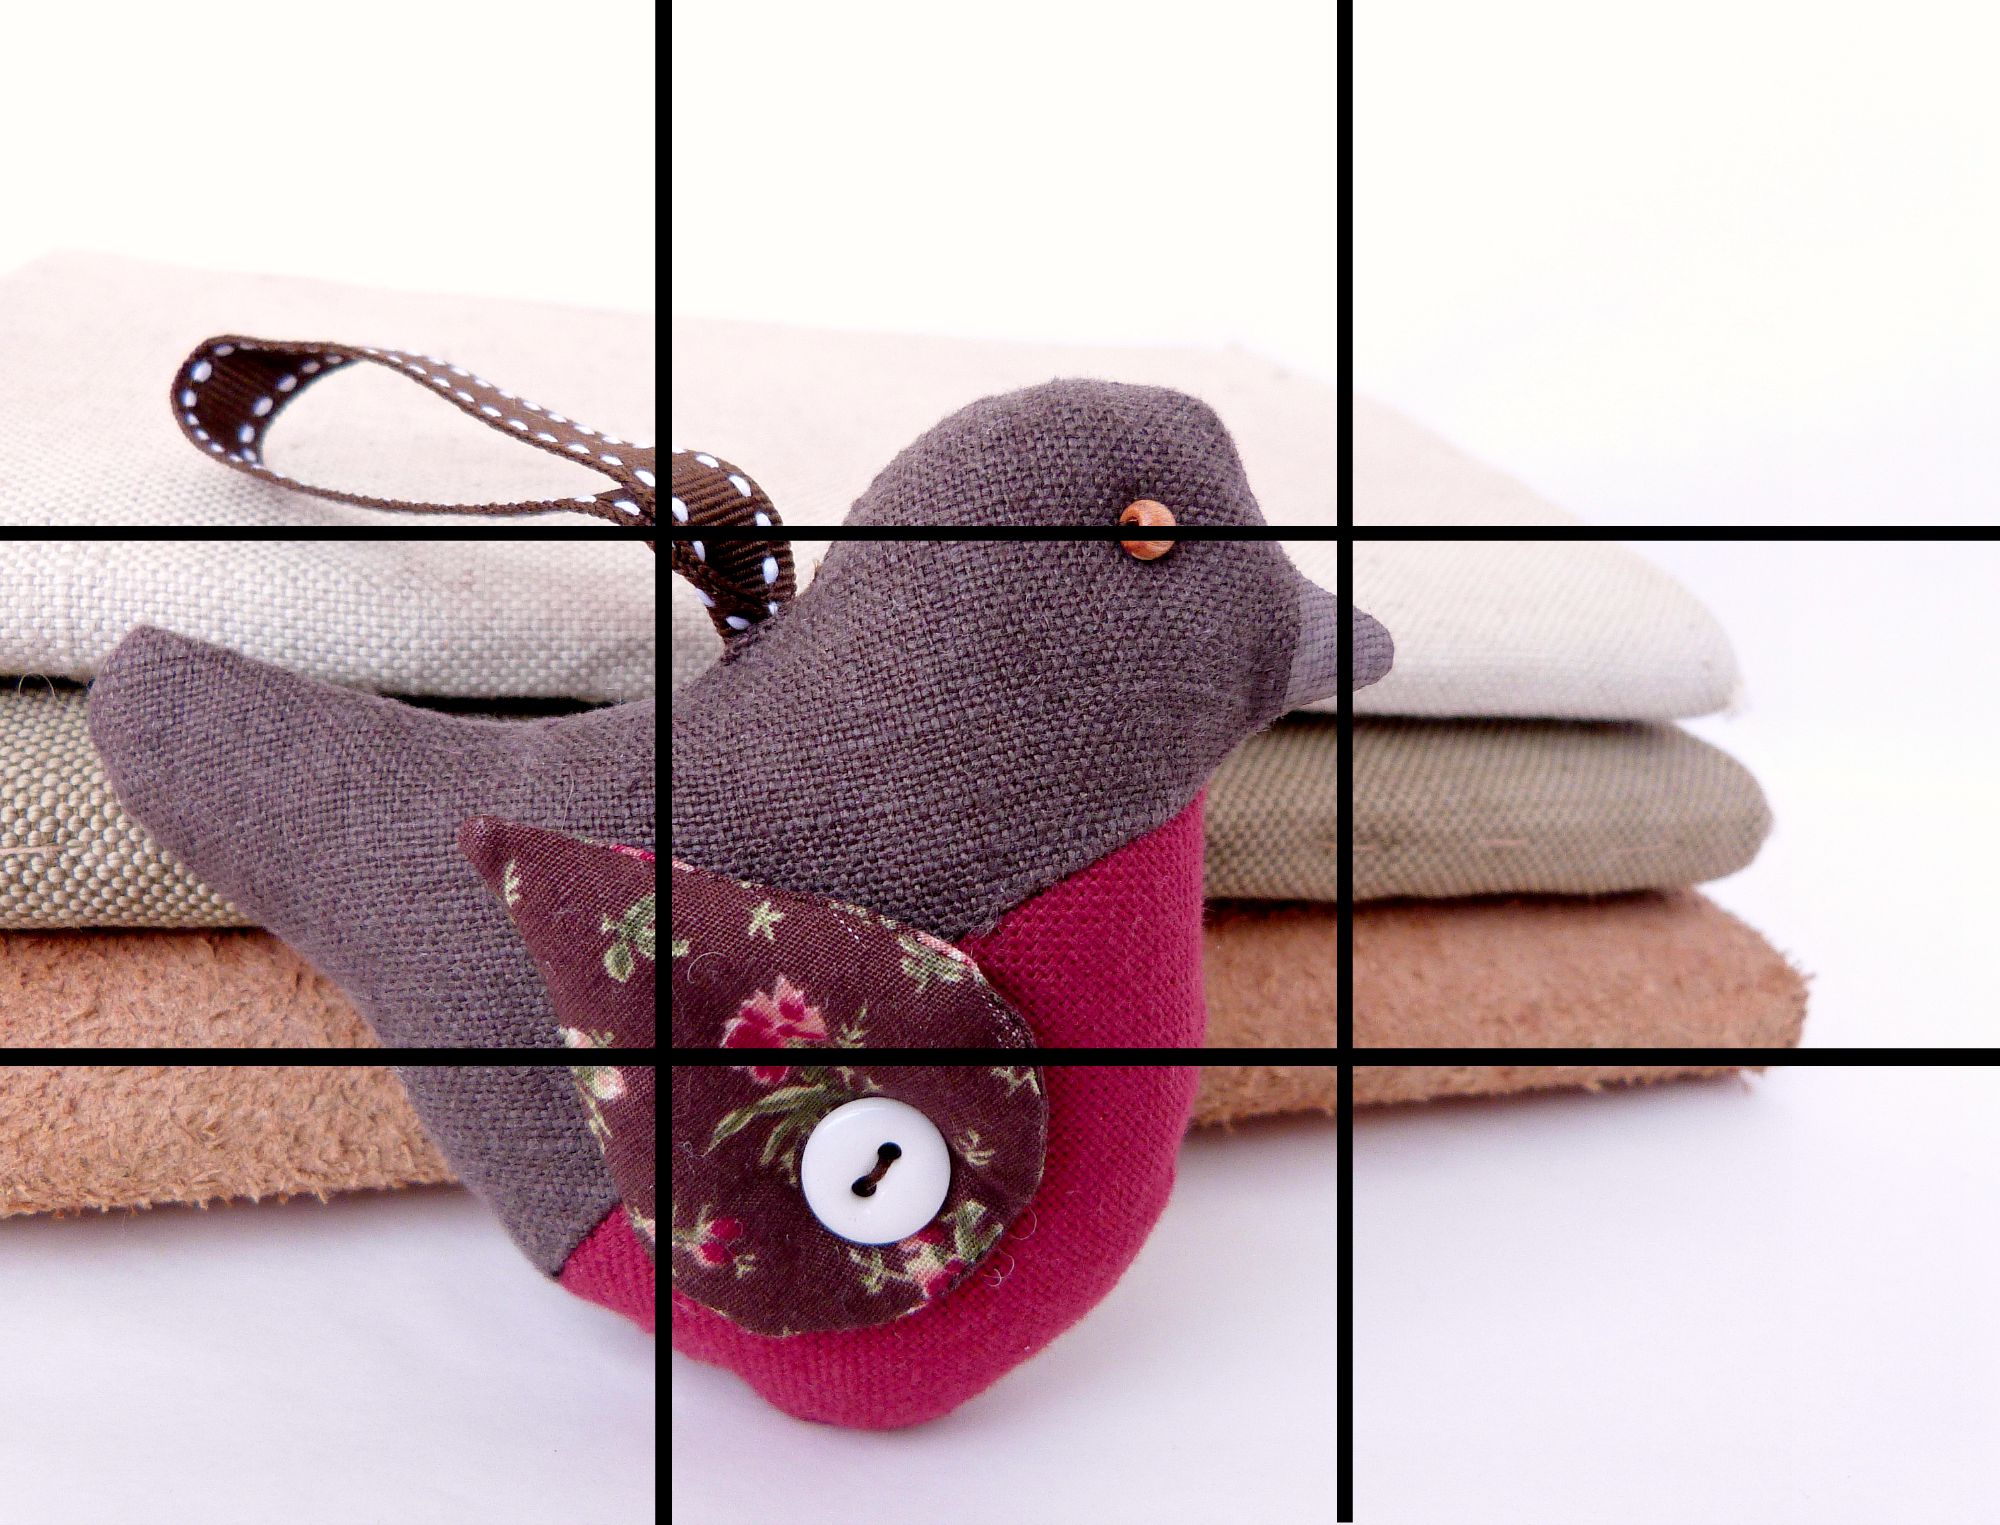
Your picture will look better if you apply the ‘rule of thirds’ to your picture composition. Without going too much into details, your picture will look more interesting if you look at the composition in a grit format. If your product is placed slightly off the centre with props where the lines are meeting, the whole picture will suddenly have a depth and interest. As you can see from the picture bellow, mine is not quite right, but it’s getting there.
The rule of third basically states that an image should be imagined as divided into nine equal parts by two equally spaced horizontal lines and two equally spaced vertical lines, and that important compositional elements should be placed along these lines or their intersections. The idea is that when you place a subject with these points it creates more tension, energy and interest in the composition than simply centering the subject.
It’s a bit strange to imagine grit running through your photo set up, but some cameras might have the grit installed as an option in the menu, so check your camera manual. If you are just starting out, take several pictures of the same subject from a different angles and you might be able to crop the picture later.
It doesn’t mean that if you don’t follow this, your pictures will look bad. But in most cases you will find that this will improve your current picture taking if you are used to just place your subject in the middle of picture and point with your camera directly at it.
Camera
If you are just starting out, use whatever you have. Even your phone (or your kid’s phone…) is going to produce reasonable pictures when you get the composition right and have plenty of natural lighting. Camera on it’s own is not going to produce magical pictures, that you think it might. At the beginning it’s more important to learn the rules of composition, choose the right props and edit your pictures afterwards.
Editing
The more time you take with composing your picture, getting the lighting right and trying different angles with your camera, the less picture editing you will need to do.
But I’ve never ever taken a picture, where the picture didn’t need editing! I’m complete amateur, but even professional photographers never ever take picture and just send it out to their clients. Every photo needs editing, even if it’s just a little bit.
What to look for:
- Most pictures can do with more lighting, extra contrast and adjusting colours a bit
- Crop to get a good angle and have an interesting composition
Editing software
Most cameras come with their own basics picture editing software. If you have never done any picture editing before, these are usually easy to follow and it’s the least that you should use. If you want to progress into something more robust, Gimp is free and will do nearly everything as good as Photoshop (which is very expensive). There are other online free picture editing software available, such as PicMonkey, which is very easy to use.
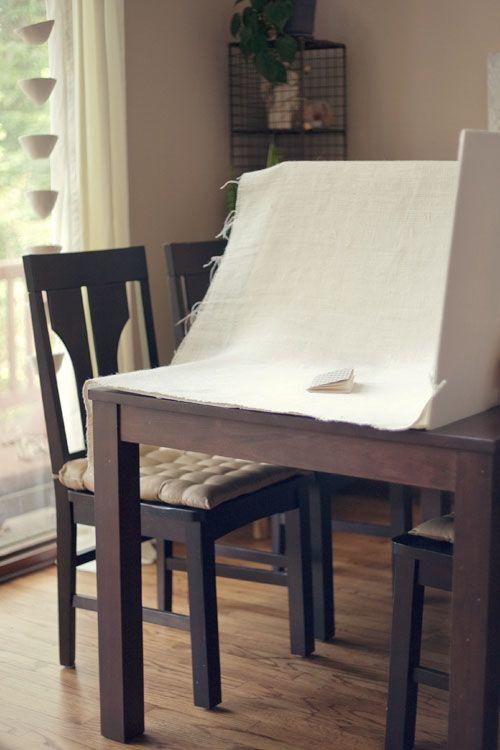
The set up
Basic Equipment
- camera
- large white card (or your background)
- reflector (proper one or made up from tinfoil or back of a large tin)
Good to have
- tripod
Basic Set Up
Choose the best room in your house, one with the most natural light. You don’t want a direct sunlight. Get table or chair as close to the window as you can. Use the large white board as a background (or as in this case piece of linen). It’s better to use one sheet that you slightly bend than separate sheets (or a box) because you get much smoother background in your photos. If you are taking photos of something messy (like me!) use thin piece of white paper under your object and just swap for new when it gets grubby. You would be surprised how annoying it is to have tiny smudges of chocolate on your background when you needed it to be absolutely white.
Position your reflector either directly in the place (like in this photo) or get somebody to hold it. Sometimes you need to move the reflector to really get the light reflecting back to the darker side of your object.
Remember to take photo from different angles.
Product Photos
Key Points
- Get plenty of day light
- Use white reflector
- Try different angles
- Remember the rule of thirds
- Staged photos seems to perform better than white background
- Always edit your pictures
- Label your main picture with the same keyword as your product
- Have as many pictures as you can
- Remember potential customer can only see your photos, they can’t see the product
Take action now!
- Review your current pictures
- If they need re-doing, can they be still used if you edit them?
- Use your product title as the main picture label
- Label all the other pictures
- Make a plan – how many pictures need re-doing?
Pictures & SEO
The search engines are pretty clever, but they are not human.
The search engine bots can’t see your pictures, it can only see the labels (picture descriptions) that you use for your pictures. The labels basically work as your keywords. You can use a string of words that best describe the picture, whilst adding your keywords at the same time.
Use the main product title as the label for the main (featured picture). By doing this, you are telling search engines that this is your main keyword and it matches your product name.
Label all the other pictures.
Remember to all search engines – picture without label is just an empty space – nothing else.
I’m completely hopeless with camera, what can I do?
There are really just two options – you either learn, practice and gradually get better or you outsource your picture taking.
How?
- Ask your friend who is good at taking photos (bake a cake or exchange for your handmade goodies)
- Network in your group of friends or colleagues and exchange photo taking for other skills you have
- Approach local colleges, who might have students who would like to build their portfolios
- Or you can of course invest into professional photos
What type of pictures should I have?
To show off your product in the best possible way, consider having as many following types of pictures as you can:
- Overall product picture
- Styled picture showing how well the product fits in the surrounding
- Showing off a functionality of the product
- Product packaging
- Special design features in detail
- Product options (different colours)
- Product personalisation (if applicable)
You can have as many as you need in your product, but 3-6 is usually sufficient
Things to avoid
- Bad lighting
- Camera flash
- Busy background
- No editing
- Strange angles where you can’t work out what’s in the picture
- No labels or descriptions on pictures
- Branding on pictures used for website or online shop
- Watermarks
Pictures that make sale happen
White Background v Styled Products
It was the norm to have product photos on a white background like in the big on-line stores. But things have changed in the recent years. Whilst beforehand handmade products pictures tried to look like mass produced products in on-line shops, these days styled photos convey the message ‘Look at me I’m handmade and you can have this wonderful lifestyle when you buy me’. much better.
Styled pictures have a soul. They make it easy for potential customer to imagine how the new handmade item is going to fit into their life. It shows them how to use it and it tells a story. Similarly like with your product description a good photo can literary seduce visitor into buying your product.
What’s the best angle to shoot from?
This is of course down to you: to find the best angle that your subject is best displayed and you get the best composition (remembering the rule of thirds).
But as a rule of thumb product photos look best when you photograph your object directly and the camera is in direct line with the product.
Why?
Well this is the interesting bit. When people look at your product on the website, they are not in the room with you (doooh…..of course, silly me….) they can’t turn the product to look at it and view it from whatever angle they want. Normally, if you pick something up (your product, mug of coffee or a book) you are looking at it from about 45% angle.
But when people are browsing website, they are sitting at their computer or laptop and looking at the product as if it was ‘on the shelf’ directly at their eye level. This means that if the product is shot that way, it’s the best angle for your potential customer to look at. This is not particularly natural, because when people get their product home, they will look at it from probably 45% degree not directly at it, because it will be in their hands not directly in front of their noses.
But with websites and computers, you can’t manipulated that and that is why aiming directly at your product and taking a photo that way makes a big difference.
It makes the photo sort of seductive and your potential customers can see directly ‘into’ the product.

Additional Resources & Downloads
EASY PHOTO EDITING
If you have existing pictures that are not up to scratch, but you can’t take the pictures again (e.g you sold the last item), you can still salvage what you can with a bit of clever editing.
FREE EDITING TOOLS
Picture Editing
Easy to use, definitely recommended for beginners and it’s miles better than not editing your pictures at all.
Fairly complex to use, probably not recommended for beginners, but it gives you everything you need. Nearly as good as Photoshop and it’s still free.
Thoughts, ideas, questions?
Handmade Business 2016